
The Interface
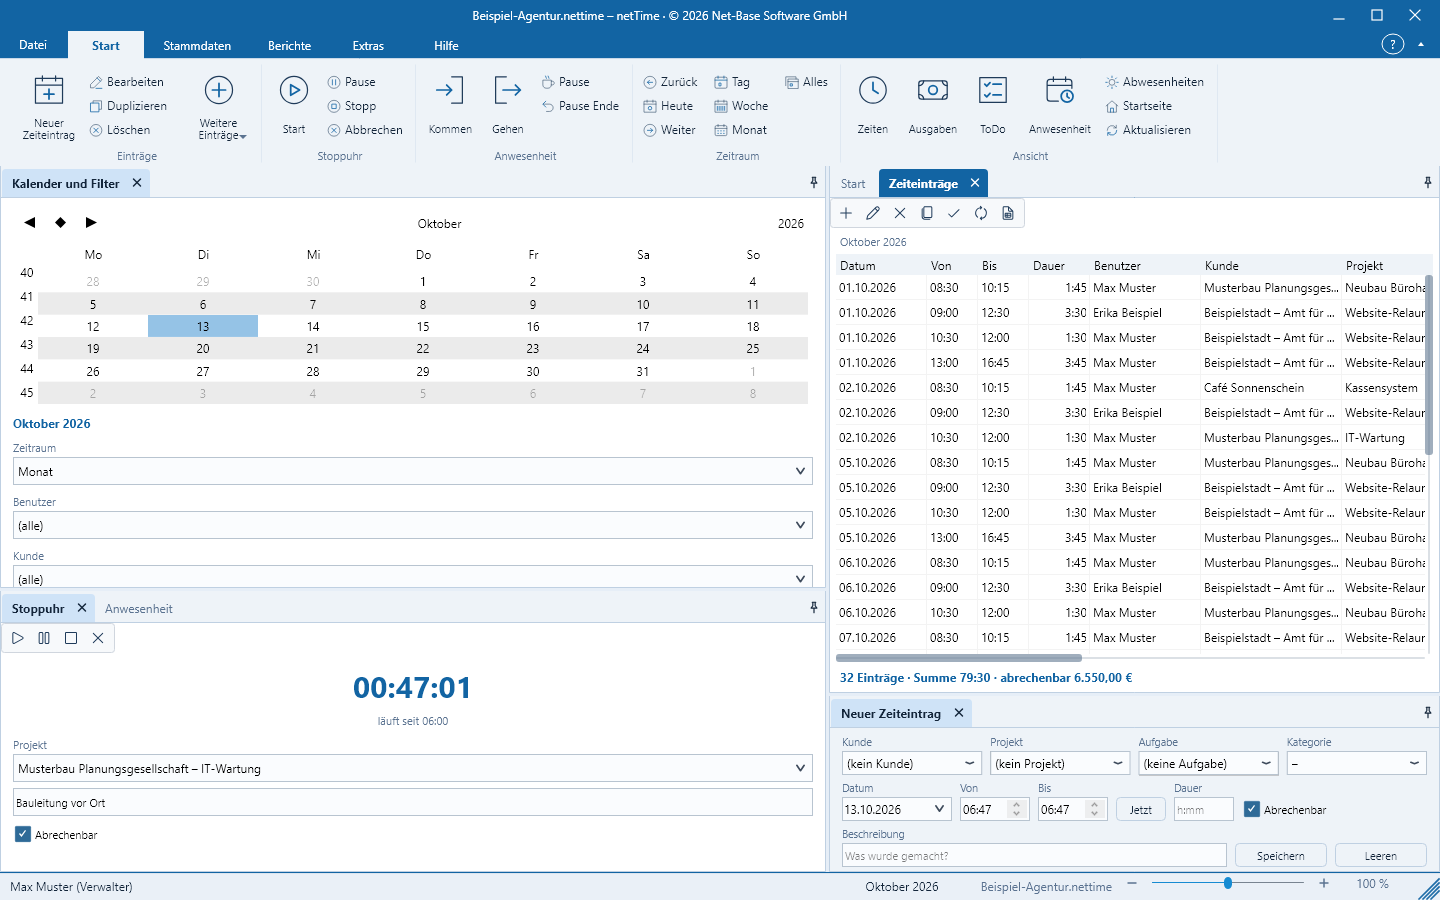
The netTime window consists, from top to bottom, of the ribbon with the File menu, the workspace with side panes and lists, and the status bar.
The ribbon
The tabs organize commands by task:
| Tab | Groups and commands |
|---|---|
| Start | Entries: New time entry, Edit, Duplicate, Delete, More entries (New expense …, New task (ToDo) …, New absence …, Record entry …) · Stopwatch: Start, Pause, Stop, Cancel · Attendance: Arrive, Leave, Break, End break · Period: Previous, Today, Next, Day, Week, Month, All · View: Times, Expenses, ToDo, Attendance, Absences, Home, Refresh |
| Master data | Customers and projects: Customers, Projects, Tasks · Lists: Categories, Priorities, Status, Tax rates, Absence types, Holidays · Users: Users, My password |
| Reports | Time sheets (menu) · Projects: Project overview, Per customer, Project list, Task list · Additional lists: Customers, Expenses, ToDo, Absences · Billing: Details, Summary · Attendance: Attendance record |
| Extras | Data: Refresh, Search, List as CSV · File: Backup, Clean up, Export JSON, Import JSON · Options: File options, Reset windows |
| Help | Help: Quick start, netTime on the web, About netTime |
Commands that require an open file are greyed out when no file is open. Commands that modify data are greyed out for the role Viewer and in read-only mode.
Collapse/expand the ribbon: The small button at the right end of the tab row collapses or expands the ribbon. netTime remembers the state.
The File menu
File left of the tabs opens the File menu with the pages Open (Open file …, Create new file …, Close file), Save (Save backup copy …, Clean up file, Export all data as JSON …, Import JSON …, Delete my data (data protection) …), Print (Time sheet, Billing Details, Attendance record), Info, Account, Options and Exit.
Side panels
On the left, by default, are the Calendar and Filter and below them the Stopwatch and Attendance as tabs of a shared area. In the center is the Start tab (home); every opened list gets its own tab there. At the bottom is the entry area New time entry.
- Move: Drag a side panel by its tab to another location.
- Reset layout: Extras > Options > Reset windows or File > Options > Reset window arrangement.
The layout is saved per user and restored at next start.
Lists
Each list — Time entries, Expenses, Task list, Absences, Attendance and Master data — is a tab in the central area with a toolbar, a table and a summary row.
- Toolbar: Add, Edit, Delete, depending on the list Duplicate, Approve / Revoke approval or Completed / open, plus Refresh and Export as CSV.
- Sorting: Click a column header; a second click reverses the direction (▲/▼).
- Editing: Double-click or
Enteron a row,Deldeletes,Inscreates a new one. - Summary row: For example 12 entries · Total 38:30 · billable €2,887.50. The selected period is shown above the table.
Input area „New time entry“
At the bottom you record a time entry in one row: Customer, Project, Task, Category, Date, From, To, Now, Duration, Billable, Description, Save, Clear. Details under Time booking.
The status bar
On the left the status bar shows the logged-in user with their role, for example Max Muster (Administrator), in the center the selected period or the state of the stopwatch, and on the right the name of the opened file. Without a file it shows No file opened.
At the bottom right use the slider and the − and + buttons to set the display size of the entire interface between 50% and 150% in 5% steps, for example for high-resolution screens. The status bar itself remains the same size.